
Amish Dinner Rolls: Soft, Buttery, and Worth Passing Around the Table
I have a particular fondness for a good dinner roll.
Not the sort that arrives in a restaurant breadbasket looking as though it's been designed by an architect, with a crust capable of removing a dental filling. I mean a proper, old-fashioned dinner roll. Soft enough to pull apart with your fingers, warm enough to melt a little butter, and substantial enough to mop up the last spoonful of gravy.
The secret is mashed potatoes. Yes, potatoes. I appreciate that adding mashed potatoes to bread dough might sound like something invented by a thrifty grandmother who couldn't bear to waste Sunday's leftovers. And perhaps that's part of its charm. But there's some very sensible baking science behind it.
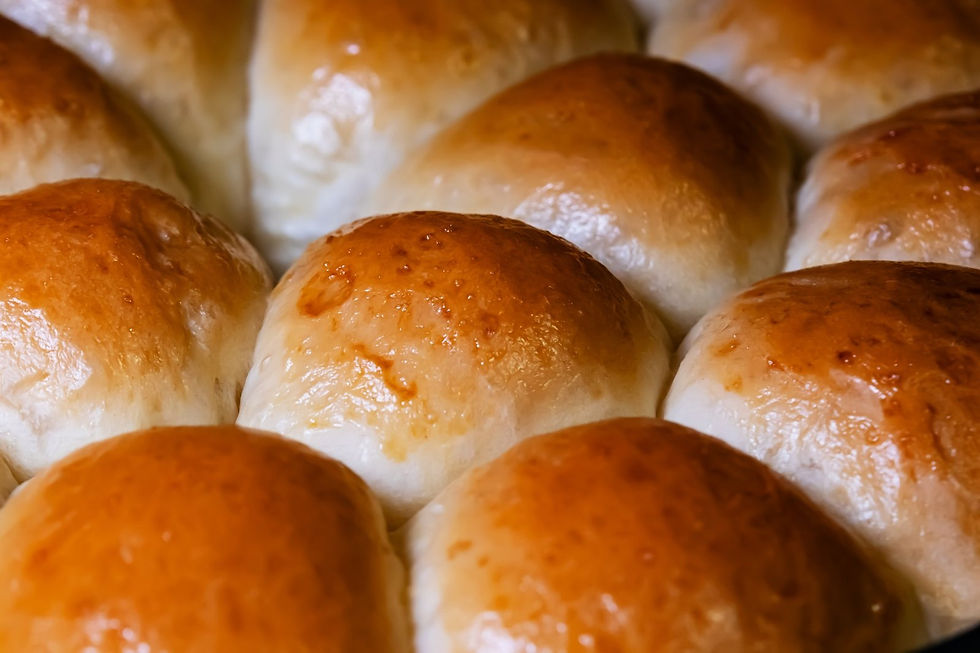
Cooked potatoes hold moisture beautifully. Combine that with butter, eggs, a little sugar and good flour, and you have soft, golden rolls, gently touching one another in the baking dish, that are quite difficult to resist.
TIME About 4 hours | SERVES Makes 16 rolls | LEVEL Easy |
BEFORE YOU START This recipe uses skills from my Kitchen School. Each lesson takes about five minutes to read. |
Why You'll Love It
THE SECRET IS POTATO Mashed potato keeps the crumb soft for longer | SOFT PULL-APART SIDES Baked snug together in one dish |
BUTTER-BRUSHED TOPS A glossy, tender crust, never crusty | MAKE THEM AHEAD Shape tonight, bake tomorrow |
Tested in my kitchen · As seen on TODAY and The Tonight Show · Parade magazine's chef for 10 years · About Chef Jon → |
Homemade Amish Dinner Rolls
Makes 16 large rolls or 24 smaller rolls | Prep: 25 minutes | Rising: about 3 to 3½ hours | Bake: 20 to 25 minutes | Total: about 4 to 4½ hours
Ingredients
For the Mashed Potato
1 medium to large baking potato, such as a Russet
For the Dinner Rolls
2 large eggs, at room temperature
⅓ cup (67 g) granulated sugar
2 teaspoons (12 g) fine table salt
6 tablespoons (85 g) unsalted butter, softened
1 cup (213 g) plain mashed potato, cooled to lukewarm or room temperature
2½ teaspoons instant or active dry yeast
About ¾ cup (170 ml) lukewarm water, ideally saved from boiling the potato
4¼ cups (510 g) all-purpose (plain) flour, preferably weighed
For Finishing
2 tablespoons (30 g) unsalted butter, melted
A little extra softened butter, for greasing the baking dish
Instructions
STEP 1 OF 9
Cook the Potato
Peel the potato and cut it into evenly sized pieces. Put it in a saucepan, cover with cold water and bring to a gentle boil. Cook until completely tender.
Before draining, save a scant 1 cup (200 ml) of the cooking water.
STEP 2 OF 9
Mash and Measure
Drain the potato well and mash until completely smooth. Don't add milk, cream, butter or seasoning. Measure 1 cup (213 g) and let it cool to lukewarm or room temperature.
Let the saved potato water cool to 100°F to 104°F (38°C to 40°C), then measure ¾ cup (170 ml) for the dough.
Chef Jon's tip: Very hot water can damage or kill the yeast. Lukewarm is what we're looking for. |
STEP 3 OF 9
Mix the Dough
In the bowl of a stand mixer fitted with the dough hook, combine the eggs, sugar, salt, softened butter, mashed potato, yeast, lukewarm potato water and flour. Mix on low speed until everything comes together into a soft dough.
STEP 4 OF 9
Knead
Keep kneading on low to medium-low speed for 8 to 10 minutes. If kneading by hand, turn the dough onto a lightly floured surface and knead for 10 to 12 minutes, using extra flour sparingly.
You'll know it's right when the dough is smooth, elastic and slightly tacky. It should feel soft rather than stiff. |
Chef Jon's tip: Resist adding flour every time the dough sticks to your fingers. Knead patiently, and a bench scraper helps with soft dough. |
STEP 5 OF 9
First Rise
Lightly grease a large bowl. Shape the dough into a ball, put it in the bowl and turn it once to coat. Cover and leave somewhere warm and draught-free for about 90 minutes, until doubled in size.
Chef Jon's tip: Watch the dough, not the clock. A warm kitchen speeds things up, a cool one slows them down. |
STEP 6 OF 9
Shape the Rolls
Grease a 9 x 13-inch (23 x 33 cm) baking dish with softened butter. Gently press down the risen dough to release some of the gas, then turn it onto a clean work surface.
Divide into 16 equal pieces for large rolls, about 2½ ounces (70 to 75 g) each, or 24 for smaller rolls. Weighing them gives the most even results.
Working with one piece at a time, pull the edges into the centre, turn it over smooth side up, then cup your hand around it and roll it against the work surface into a smooth, tight ball. Arrange the rolls evenly in the dish, leaving a little room between them.
STEP 7 OF 9
Second Rise
Cover the dish loosely with lightly greased plastic wrap or a clean, damp kitchen towel. Leave to rise for 90 minutes to 2 hours, until noticeably puffy and almost touching. Towards the end, heat the oven to 350°F (175°C).
You'll know it's right when a gentle poke with a floured finger leaves a dent that slowly springs back. If it springs back straight away, give them a little longer. |
If something's off: if the rolls go in too early they can be dense. Left too long, they can collapse. |
STEP 8 OF 9
Bake
Uncover the dish and bake on the centre rack for 20 to 25 minutes, until the rolls are golden brown and cooked through. Larger rolls may need a few minutes more.
You'll know it's right when an instant-read thermometer in the centre of a roll reads 190°F to 200°F (88°C to 93°C). |
STEP 9 OF 9
Butter and Rest
Brush the tops generously with the melted butter straight away. Leave the rolls in the dish for 5 minutes, then move them to a wire rack, together if you like, and cool for another 5 to 10 minutes.
Serve warm, with extra butter if you like.
Chef Jon's tip: Tearing into bread straight from the oven can leave you with a gummy centre and a burnt fingertip. Five or ten minutes of patience is a reasonable compromise. |
Tips & Chef's Notes
Use a floury baking potato, such as a Russet. It mashes easily and gives a lighter texture. Waxy potatoes can turn gluey when mashed.
The mash must be plain. No milk, cream, butter or seasoning, just potato cooked until tender and mashed until smooth.
For 16 large rolls, each piece weighs about 2½ ounces (70 to 75 g), depending on the final weight of your dough.
Made it? I'd love to see it
Share a photo or ask me a question. I read every one. Enjoyed it? Tap the stars at the bottom of the page to rate it.
Key Ingredients
Mashed Potato: Its cooked starch holds on to moisture, giving the rolls a soft, tender crumb that stays pleasant long after they've cooled.
Potato Cooking Water: A little starch from the potato ends up in the water, and it makes good use of something you've already prepared.
Butter and Eggs: Just enough richness to make the rolls taste luxurious without becoming sweet like a pastry.
All-Purpose Flour: Weighed for accuracy. Too much flour makes heavier rolls with a drier crumb.
Instant or Active Dry Yeast: Does the work during the two rises, creating the small air pockets that make the rolls light.
Why Mashed Potatoes Make Better Dinner Rolls
When potatoes cook, their starch granules absorb water and swell. Adding that cooked starch to bread dough helps it hold on to moisture, so the crumb is softer and stays tender for longer.
And despite what you might imagine, the finished rolls don't taste particularly of potato. The flavour is subtle, almost impossible to pick out. They simply taste like very good bread, with a gentle springiness that makes them a pleasure to pull apart.
Baking them close together matters too. As they rise they touch, which gives those wonderfully soft sides when you pull them apart.
Weighing your ingredients? My kitchen conversions guide has cups to grams for the baking basics.
Common Mistakes to Avoid
Adding too much flour: the dough should be soft and slightly tacky. Extra flour makes heavy, dry rolls.
Using hot potato water: let it cool to 100°F to 104°F (38°C to 40°C) so it doesn't harm the yeast.
Seasoning the mash: plain potato only. Milk, butter or salt in the mash throws the recipe off balance.
Using waxy potatoes: they can turn gluey. Choose a floury baking potato.
Rushing the second rise: under-risen rolls bake up dense. Use the gentle finger test.
Tearing in straight from the oven: give them 5 to 10 minutes so the centres set.
What to Serve with Amish Dinner Rolls
A Sunday roast, like my Roast Chicken, with plenty of gravy
A spoonful of Creamy Mashed Potatoes
How to Store
Make ahead: After the first rise, shape the rolls, arrange them in the dish, cover and refrigerate overnight. The next day, let them finish rising at room temperature until puffy, about 1 to 2 hours, then bake as directed.
Reheat: Arrange the rolls in a baking dish, cover loosely with foil and warm at 300°F (150°C) for 10 to 15 minutes, until heated through. Brush with a little more melted butter if you like.
Freezer: Cool the baked rolls completely, wrap well and freeze in a freezer-safe container or bag for up to 3 months for best quality. Thaw at room temperature, then warm gently in the oven.
Frequently Asked Questions
Why do Amish dinner rolls contain mashed potatoes?
Mashed potatoes help retain moisture in the dough, creating rolls with a soft, tender crumb that stays fresh longer than many ordinary dinner rolls.
Do Amish potato rolls taste like potatoes?
Not particularly. The potatoes contribute mainly to the texture, giving the rolls a soft, fluffy interior rather than a pronounced potato flavour.
Can I use leftover mashed potatoes?
Yes, provided they're plain and haven't been heavily seasoned or mixed with milk, cream, or butter. For the most consistent results, freshly cooked, unseasoned mashed potatoes are best.
Can I make Amish dinner rolls without a stand mixer?
Absolutely. The dough can be mixed and kneaded by hand. Expect about 10 to 12 minutes of kneading to develop a smooth, elastic dough.
Why are my dinner rolls dense?
Dense rolls can result from adding too much flour, insufficient kneading, inactive yeast, or not allowing the dough enough time to rise.
Can I make Amish dinner rolls the night before?
Yes. Shape the rolls after the first rise, refrigerate overnight, then allow them to finish proofing at room temperature before baking.
How do I keep homemade dinner rolls soft?
Avoid adding excessive flour, bake only until cooked through, and brush the warm rolls with melted butter. Store them in an airtight container once completely cool.
Can I freeze Amish dinner rolls?
Yes. Baked and cooled rolls can be frozen for up to three months for best quality. Thaw and warm gently before serving.
What should I serve with Amish dinner rolls?
They're wonderful with roast chicken, turkey, beef, hearty soups, stews, and practically anything accompanied by a good gravy.
One Last Thing
I think these rolls are particularly lovely with a Sunday roast. A generous spoonful of gravy, a little roast chicken, perhaps some buttery mashed potatoes. And a warm roll sitting patiently at the edge of the plate, waiting to mop up whatever remains.
They're equally welcome at Thanksgiving, Christmas, or an ordinary family supper. In fact, I suspect that's where they're at their best: at a table where everyone is hungry, the food is good, and nobody feels the need to stand on ceremony.
Just remember to make enough. Because when a basket of warm, buttery dinner rolls reaches the middle of the table, people tend to become surprisingly enthusiastic about bread.
Recommended Equipment
Make this recipe easier with the right tools: Stand Mixer, Digital Scale, Baking Dish and Instant-Read Thermometer.
You Might Also Like
If you enjoyed this recipe, you might also love my Daily Bread, Tomato Focaccia and Homemade Chicken Noodle Soup.


Comments